This is the 3rd and final article of our series on Custom Post Types (CPT). The topics we discussed in the first two were:
In the first and second articles, we registered the testimonials custom post type and the testimonial_service custom taxonomy. We now have to display the testimonials on our site. So we will take a look at how to create a template for our testimonials, how to query them, and how to display them anywhere on our site.
Default Custom Post Type Templates
We created our CPT with the parameter has_archive set to true, which will display all testimonials in an archive page.
WordPress uses a template hierarchy to display different types of content. For the custom post type, it will look for:
archive-{post_type}.php
single-{post_type}.php
If these templates are not defined in the theme, then it will look for the general templates:
archive.php
single.php
If even these templates are not defined, then it will default to the index.php template.
In our case the Shaka theme has the single.php, but does not have the archive.php template. This means that it will, by default, use the single.php template for the single testimonial page. It will also use the index.php template to display all testimonials in the testimonials archive page.
The testimonials will be displayed in the testimonials archive page, which will be located on this page:
http://your-domain-goes-here.com/?post_type=testimonials
If you have the pretty permalinks enabled, then you can also access the page with this URL:
http://your-domain-goes-here.com/testimonials
(Note: if the pretty permalinks are not working for you, go to wp-admin -> Settings -> Permalinks and set them up, the way you want them and save the settings)
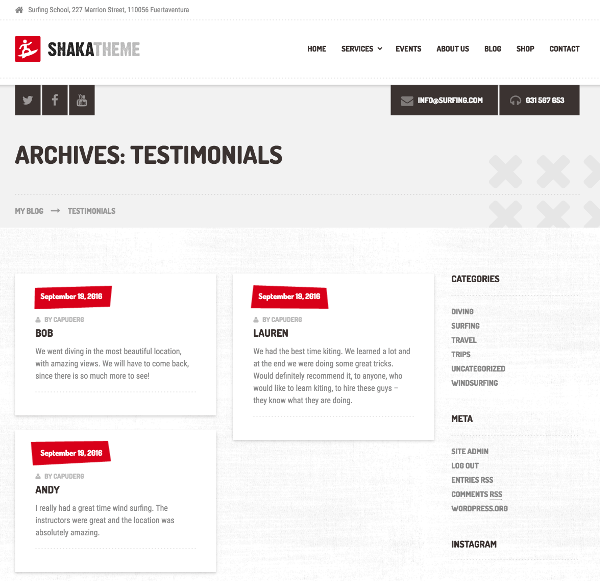
First, we should write some testimonials in the newly registered CPT Testimonials, so we have some data to display. I’ve added 3 testimonials and this is how the default layout of the testimonials archive page looks on our Shaka theme:

As you can see the layout is ok, but some of the data displayed is not needed, like the “by author” and the date. Also the testimonial_service custom taxonomy is not displayed, so we will add that in our custom templates.
Creating custom templates for our CPT
As mentioned in the previous section, we have to create two templates. The archive-testimonials.php and the single-testimonials.php. We will only create the archive-testimonials.php template for this example.
We should create these files in a child theme, but for the sake of simplicity, I’ll add the archive-testimonials.php file directly in the Shaka theme. I’ll copy the index.php file, which will serve as a starting point, and rename it to archive-testimonials.php.
I’ve removed the “by author”, the date code, and the sidebar. I have added the featured images and the testimonials service custom taxonomy. I’ve used the the_terms WP function that displays a list of specific WP terms, in our case the custom taxonomy.

I know that aesthetically it does not look awesome, but that’s not the point. We wanted to create a different structure/layout of the testimonials archive page with different data, and that was achieved in a few minutes.
We could also do the same for the single testimonials page. We would copy the single.php file and rename it to single-testimonials.php and change the code from there.
I didn’t show any code here as the code examples would be different for each theme and some basic knowledge of HTML and PHP is needed to code templates. But it’s always easier to modify an existing template, that’s why we used the index.php as our starting point.
Querying Custom Post Types
Another way to display custom post types on your site is to use the WP_Query class to fetch the custom post types (loop through and display them).
Let’s say you want to build a widget that displays all testimonials in a carousel. Or, that you would want to display related testimonials (same testimonial service taxonomy) on the single testimonial page. You would use the WP_Query class to retrieve the relevant testimonials.
In our example we will fetch all the testimonials that are in the “diving” testimonial service custom taxonomy and we’ll output them in a list:
<?php
$args = array(
  'post_type'   => 'testimonials',
  'post_status' => 'publish',
  'tax_query'   => array(
  	array(
  		'taxonomy' => 'testimonial_service',
  		'field'    => 'slug',
  		'terms'    => 'diving'
  	)
  )
 );

$testimonials = new WP_Query( $args );
if( $testimonials->have_posts() ) :
?>
  <ul>
    <?php
      while( $testimonials->have_posts() ) :
        $testimonials->the_post();
        ?>
          <li><?php printf( '%1$s - %2$s', get_the_title(), get_the_content() );  ?></li>
        <?php
      endwhile;
      wp_reset_postdata();
    ?>
  </ul>
<?php
else :
  esc_html_e( 'No testimonials in the diving taxonomy!', 'text-domain' );
endif;
?>
As you can see in the code above, we first prepare the array of argument settings, that is later used in the WP_Query initialization. In this array, we define to retrieve:
- `testimonials` CPT,
- get only the testimonials that are published,
- get only the testimonials that are in the diving custom taxonomy `testimonial_service`.
When the new WP_Query is called, the relevant testimonials are retrieved and we can loop through them. In the loop we simply output the title (which I used for the author name) and the content of the testimonial in a simple list. Also, we should always use the wp_reset_postdata function, to reset back to the original loop, when we use a WP_Query loop. This will ensure that everything works after we finish with our custom query.
These have been the basics of Custom Post Types, and I hope you now understand how they work. As with any topic, there are always more details to go into. I would advise you to go through the official WP documentation for all the functions and classes we used in these examples. Let me know in the comment section below, if you have any questions.


